A buttery biscuit topping, a jammy lemon-kissed blackberry filling, and immediate drooling by all who encounter it — this blackberry cobbler is the summer dessert I make every single time I get my hands on a good haul of blackberries.


This post may contain affiliate links. As an Amazon Associate, I earn from qualifying purchases. Please see my disclosure policy for details.
For more summer cobbler recipes, check out my Strawberry Cobbler, Cast Iron Peach Cobbler, Raspberry Cobbler, and Fresh Apricot Cobbler.
Table of Contents
If you ask me to make a summer dessert, nine times out of ten I will choose cobbler. When I'm lucky enough to score an armload of fresh blackberries, it's always this blackberry cobbler.
I've been making cobblers and crisps since high school — I'd whip one up on weekends when my brother had friends over to play video games, and those guys never failed to crush the whole pan in one sitting. There is nothing more satisfying than watching people inhale something you made with gusto. I still chase that feeling every summer, dishing out baked goods to any and all friends, neighbors, and family who will take them.
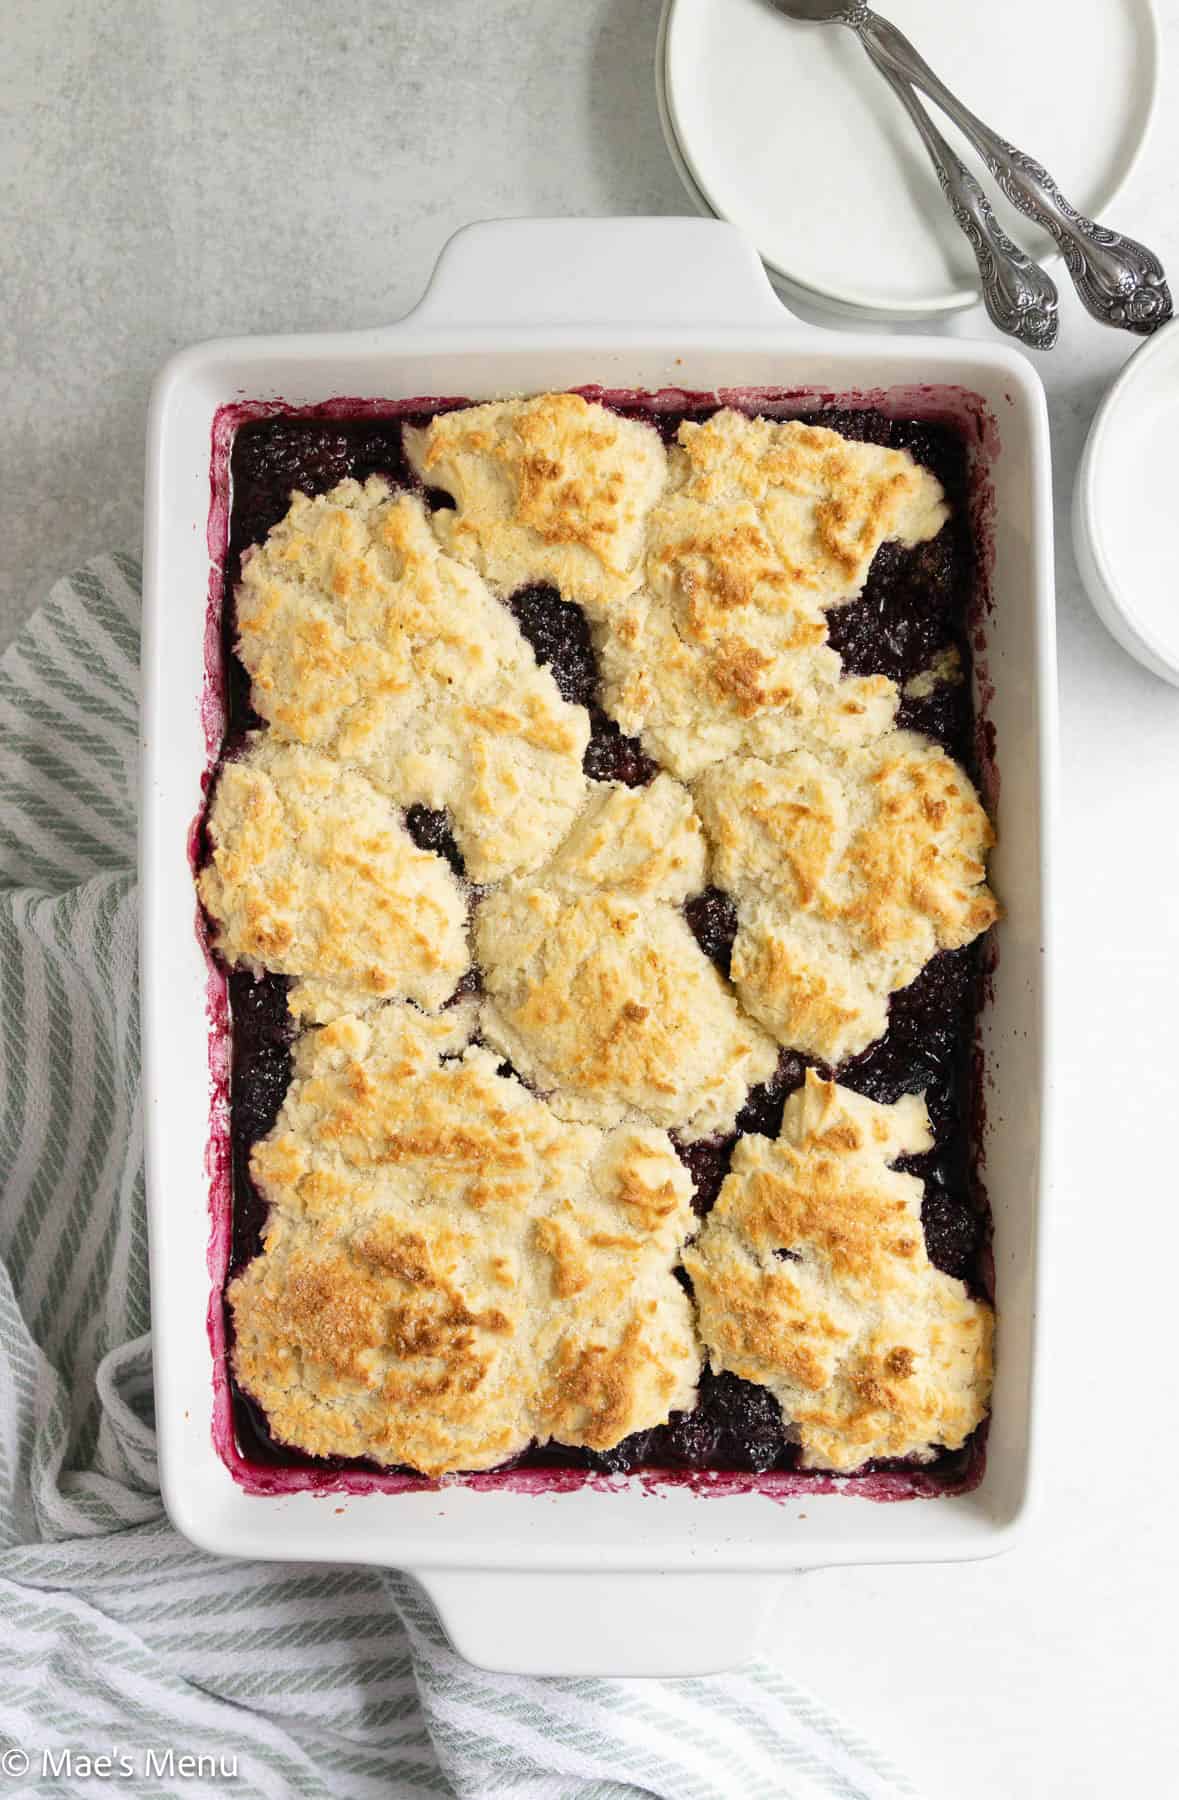
What makes this the best blackberry cobbler recipe I've ever made — and I've made a lot of them — is the biscuit topping. Not a poured cake batter, but a real cold-butter biscuit dough, dropped in scoops over a jammy, lemon-kissed berry filling. The biscuits bake up golden and flaky on top, with the blackberry juices bubbling up around the edges and through the gaps.
Yes, this blackberry dessert requires turning the oven on. But it is 10/10 worth it every single time. Promise.
For more blackberry recipes: Blackberry Muffins and Blackberry Bourbon Smash.

Why Biscuit Topping (Instead of Cake Batter)
Most blackberry cobbler recipes use a poured batter — you melt butter in the pan, pour batter over it, then add fruit on top. It's easy, and it's fine. But this recipe uses a sweet biscuit dough instead (my preference), and the difference is noteworthy.
Biscuit topping vs. cake topping: A biscuit topping is flakier, more buttery and tender, and overall more texturally interesting. Think: blackberry shortcake, but in cobbler form. More like flaky biscuits sitting on top of saucy berries instead of a uniform cake layer.
A note on cold butter and buttermilk: Cold (like fresh-from-the-fridge-cold) butter and buttermilk are everything. Cold fat creates steam pockets as it bakes, giving you those beautiful flaky layers. Warm butter means dense, tough biscuits.
Fresh vs. Frozen Berries
Both work well and allow you to use what you have on hand, but baking times and results may vary slightly. Here's your berry guide:
Fresh Blackberries: The best choice during peak season (July–August). You want berries that are ripe, fragrant, and deep purple-black. Slightly tart berries are actually ideal here — the sugar in the filling balances them perfectly.
Frozen Blackberries: Great year-round. Do NOT thaw them first — adding frozen berries straight from the freezer prevents a watery filling. Add 5–7 extra minutes to the bake time and wait until the juices are rapidly bubbling before pulling from the oven.
Important Ingredients and Substitutions


Buttermilk — The acid in buttermilk reacts with the baking powder for extra lift and tenderness in the biscuit topping. No buttermilk? Make a quick sub: add 1 tablespoon of white vinegar or lemon juice to a scant ¾ cup of whole milk, stir, and let sit 3–5 minutes. For a dairy-free version, use plant milk with 2 teaspoons of distilled vinegar.
Unsalted butter — Must be extra cold for the biscuit topping. Cut it into small chunks and refrigerate or freeze until ready to use. Vegan butter works as a substitute.
Turbinado or sanding sugar — Sprinkled on top before baking for a crackly, sparkly crust. Coarse raw sugar or demerara sugar substitutes well. Don't skip it — it's a small detail that makes a visible difference.
Lemon zest — Optional but highly recommended. It brightens the filling and gives the blackberries a subtle citrus lift, making the whole thing taste more vibrant.
Recipe Variations
I've made a lot of cobbler variations — here are the ones worth repeating:
- Mixed Berry Cobbler — Swap the blackberries for any combination of blueberries, raspberries, and strawberries. Any berry works beautifully in this filling.
- Peach Blackberry Cobbler — Replace half the blackberries with diced fresh peaches. The sweet-tart combination is a summer dream.
- Gluten-Free — Swap the all-purpose flour in both the filling and biscuit topping with a 1-to-1 gluten-free flour blend. Let the biscuit dough rest 5 minutes before scooping.
- Dairy-Free/Vegan — Use vegan butter in place of unsalted butter and vegan buttermilk (plant milk + 2 teaspoons distilled vinegar, rested 3–5 minutes) in place of regular buttermilk.
- Individual Ramekins — Divide the filling and biscuit dough among 6–8 small ramekins, then bake at 375°F for 25–30 minutes. Perfect for dinner parties.
How to Make Blackberry Cobbler
For the complete recipe and measurements, scroll to the recipe card at the bottom of this post.
Prepare: Preheat the oven to 375°F. Once hot, add 2 tablespoons of butter to a 9x13-inch baking dish. Place in the preheated oven until the butter melts. Remove from the oven.

Step 1: In a large bowl, gently toss together the blackberries, brown sugar, granulated sugar, flour, cinnamon, nutmeg, and lemon zest until combined.

Step 2: Pour the berries over the melted butter in the baking dish.

Step 3: In a medium bowl, whisk together the flour, sugar, salt, and baking powder. Add the cold butter.

Step 4: Cut the butter in with a fork or pastry cutter until the butter pieces are the size of small pebbles. Slowly add the cold buttermilk.

Step 5: Stir until just about 80% incorporated — there should still be a few streaks of flour remaining. Do not overmix.

Step 6: Spoon the biscuit dough in 2–4 tablespoon scoops over the blackberry filling, spacing the scoops 1–2 inches apart. Sprinkle turbinado sugar evenly over the top.

Step 7: Bake for 38–42 minutes until the biscuits are deep golden brown and the blackberry juices are rapidly and vigorously bubbling around the edges and through the biscuit gaps.
Step 8: Remove from the oven and rest 15–20 minutes before serving warm with whipped cream or ice cream.

Chelsea's Recipe Pro-Tips

- The 80% mixing rule — Stop mixing the biscuit dough when about 80% of the buttermilk is incorporated. A few streaks of flour are fine. Undermixing keeps the topping tender and flaky; overmixing develops gluten and makes it tough and chewy.
- Melt the butter in the pan first — Melting butter directly in the hot baking dish before adding the filling coats the bottom and creates a rich, caramelized base layer. Don't skip this step.
- Space those biscuit scoops — Drop the biscuit dough 1–2 inches apart, not in one continuous layer. The gaps let steam escape, allow the filling to bubble through visibly, and give each biscuit room to rise and brown properly.
- Wait for rapid bubbling — This is how you know the cobbler is done. Not gently simmering — rapidly and vigorously bubbling around the edges and through the biscuit gaps. This tells you the berries have simmered and the sauce thickened properly.
- Rest before serving — Let the cobbler rest 15–20 minutes before digging in. The filling continues to thicken as it cools. Cutting in too early = runny cobbler.
- Don't skip the turbinado sugar — That sprinkle on top bakes into a crackly, sparkly crust that makes the cobbler look and taste like it came from a proper bakery.
High-Altitude Adaptations
Tested and developed in Fort Collins, CO, at approximately 5,000 feet. It's one of the very few blackberry cobbler recipes with proven high-altitude adjustments.
At 5,000+ feet:
- Reduce baking powder to 1 teaspoon (from 1½ teaspoons)
- Reduce sugar in biscuit topping by 1 tablespoon
- Frozen berries may need the full 47–49 minutes at altitude
At sea level: Follow the recipe as written.
Storage Directions
- Refrigerating: Cover and refrigerate for up to 3–4 days. The biscuit topping softens slightly overnight, but the cobbler is still delicious cold straight from the fridge — ask me how I know.
- Freezing: Store in a freezer-safe airtight container for up to 2 months. Thaw the cobbler overnight in the refrigerator.
- Reheating: Warm covered in a 350°F oven for 15–20 minutes, or microwave individual portions for 45–60 seconds.

Serving Suggestions
This cobbler is a summer dessert that needs very little help — but a big scoop of vanilla ice cream is non-negotiable in my house. For a lighter option, a dollop of fresh whipped cream is the perfect touch.
It's also excellent at room temperature for potlucks and backyard cookouts — and equally good cold from the fridge the next morning, which technically makes it breakfast.
Blackberry Cobbler FAQs
The biscuit topping should be golden brown and hollow when tapped; the blackberry juices should be vigorously bubbling around the edges. The rapid bubbling tells you the filling has reached the right temperature and thickened properly.
This is almost always caused by underbaking or cutting into it too soon. Make sure the juices are rapidly bubbling before removing from the oven, and let the cobbler rest 15–20 minutes before serving. The filling continues to thicken as it cools.
Yes. Use them straight from the freezer; do not thaw first. Thawing makes the filling watery. Add 5–7 extra minutes to the bake time and wait until the juices are rapidly bubbling before pulling from the oven.
A cobbler has a biscuit or cake-like dough topping dropped over fruit filling. A crisp has an oat-and-butter crumble topping. A cobbler is softer and more biscuity; a crisp is crunchier and more granola-like. Neither has a bottom crust — that's what separates both from a pie. For a crunchier topping, try my Blueberry Peach Crisp.
This recipe uses flour tossed directly with the berries before baking. As the cobbler bakes, the flour combines with the blackberry juices to create a thick, jammy filling. The key is baking until the juices are rapidly bubbling — that's when the filling has properly thickened.
Yes — this recipe for blackberry cobbler is great for entertaining. You can assemble the filling up to 24 hours ahead and refrigerate covered. Make the biscuit dough right before baking — it loses flakiness if made ahead. Baked cobbler reheats well at 350°F covered for 15–20 minutes.
Yes — any berry or combination works beautifully. Blueberries, raspberries, strawberries, and cherries all make great cobbler recipes. Mixed berry is especially good.
Yes — after it cools, cover and refrigerate for 3–4 days.
Yes — swap the all-purpose flour in both the filling and the biscuit topping with a 1:1 gluten-free flour blend. Let the dough rest 5 minutes before scooping.
This recipe uses a standard 9x13-inch baking dish or casserole dish. You can also use a large cast iron skillet.
Save this Recipe for Later on Pinterest

More Summer Dessert Recipes


If you liked and made this Easy Blackberry Cobbler Recipe, don't forget to rate it and let me know how you liked it in the comments. I always love hearing from you!
Recipe Card
Blackberry Cobbler
Ingredients
Blackberry Filling
- 2 tablespoons Unsalted Butter
- 2 lb. blackberries about 6 ½-7 cups
- ¼ cup packed light brown sugar
- ¼ cup granulated sugar
- 1 ½ tablespoon all-purpose flour
- 1 ½ teaspoon ground cinnamon
- ¼ teaspoon ground nutmeg
- 1 teaspoon lemon zest optional but recommended
Sweet Biscuit Topping
- 1 ¾ cup (210g) all-purpose flour
- ½ cup granulated white sugar
- ¼ teaspoon salt
- 1 ½ teaspoon baking powder
- ¼ cup unsalted butter extra cold
- ¾ cup buttermilk extra cold
- 1 tablespoon turbinado or sanding sugar
Instructions
- Preheat oven to 375°F.
- Add 2 tablespoons butter to a 9x13-inch baking dish. Place in oven until butter melts. Remove from oven.
- In a large bowl, toss together blackberries, brown sugar, granulated sugar, flour, cinnamon, nutmeg, and lemon zest. Pour over melted butter in the baking dish.
- In a medium bowl, whisk together flour, sugar, salt, and baking powder. Cut in cold butter with a fork or pastry cutter until pieces are the size of small pebbles.
- Slowly add cold buttermilk, stirring until about 80% incorporated — a few streaks of flour should remain. Do not overmix.
- Spoon biscuit dough in 2–4 tablespoon scoops over the filling, spacing 1–2 inches apart. Sprinkle turbinado sugar over the top.
- Bake 38–42 minutes until biscuits are deep golden brown and blackberry juices are rapidly and vigorously bubbling.
- Rest 15–20 minutes before serving.
Notes
- The 80% rule — stop mixing when 80% of the buttermilk is incorporated. Undermixing = tender biscuits. Overmixing = tough biscuits.
- Cold butter and buttermilk — keep both extra cold for the flakiest topping.
- Frozen blackberries — use straight from freezer, do not thaw. Add 5–7 extra minutes bake time.
- Buttermilk sub — 1 tablespoon vinegar or lemon juice + scant ¾ cup whole milk, rested 3–5 minutes.
- Dairy-free/vegan — use vegan butter and vegan buttermilk (plant milk + 2 teaspoons distilled vinegar).
- Gluten-free — swap flour in the filling and topping with a 1:1 gluten-free blend.
- High altitude (5,000+ ft) — reduce baking powder to 1 teaspoon, reduce biscuit sugar by 1 tablespoon.
- Storage — refrigerate covered for up to 3–4 days, freeze for up to 2 months.
